

The absolute beginner’s guide to Docker
Jan 16th, 2020 (Edited: Feb 22nd, 2022)
The purpose of this tutorial is to illustrate, to a complete beginner, how Docker works and how it can radically simplify their development environment and dependency management. Focus is on the very basics.
We'll talk enough about how Docker and containers work and what they mean, but we'll keep it at a general and, most importantly, practical level.
In the end of the tutorial we'll also note some helpful extra commands, including cleaning up images and containers from your machine.
Contents
- Prerequisites
- Containers and Docker, a short terminology
- Building a very basic image, just to understand what an image is
- Docker Hub, continuous processes and detached containers
- Ports and volumes
- Environment variables
- Where to go from here, including ready-to-use examples
- Other helpful commands when getting started, including a cheatsheet
Prerequisites
- Download Docker here for Mac or Windows (note that we will be using some Unix commands in this tutorial; Windows users may still be able to follow)
- You should be familiar with basic Unix commands and comfortable with using the terminal
Containers and Docker
Let's start by clearing up the concepts and terminology:
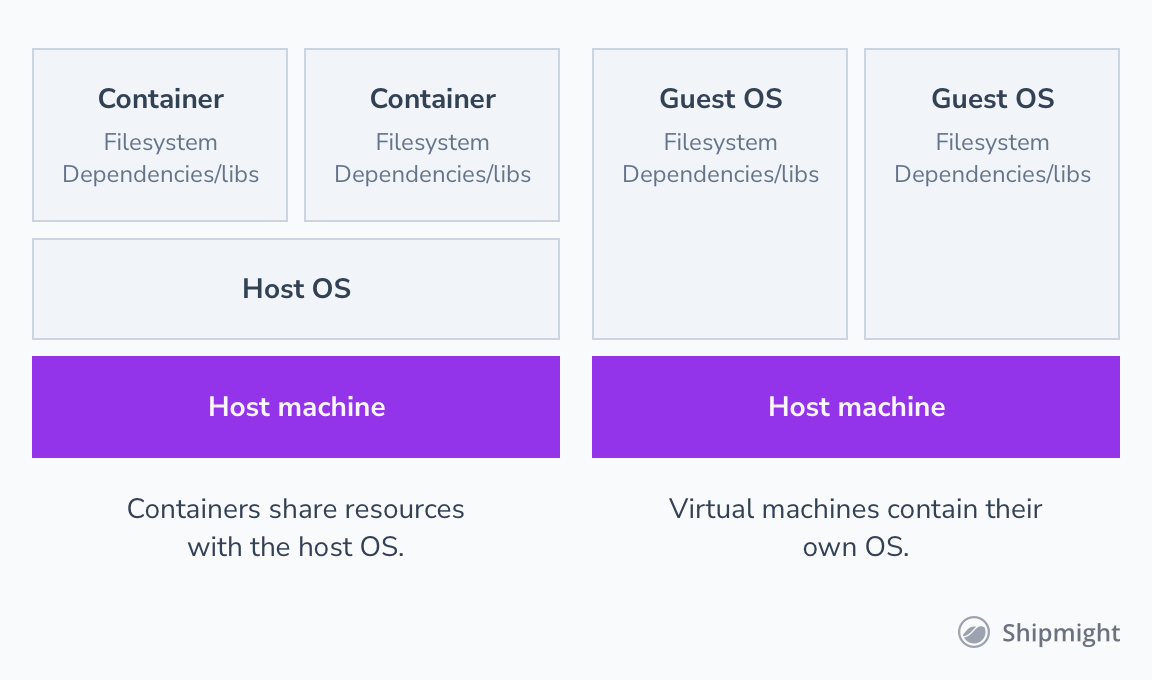
- Containers are isolated parts of your operating system. They are almost like virtual machines. The difference is that they share a lot of resources, like the kernel, with the host operating system, whereas virtual machines enclose their own operating systems completely. Containers are much lighter to set up and run, but they are just as sufficient for running isolated software.
Simplified comparison of containers and virtual machines:
-
Docker is a suite of tools for configuring, running and managing containers. The main command line tool,
docker, can be used to quickly configure and start containers using pre-built images. The suite also includes tools likedocker compose(previously a separate command calleddocker-compose, now included as a subcommand ofdocker), which is used to quickly start and stop a specific configuration of multiple containers. -
Images are pre-built containers for Docker. In virtual machine land they would be comparable to VM snapshots. Anyone can build an image and then share it, and others will be able to run it without having to build it themselves. Also, images can be extended.
Note: Containers and container images are not exclusive to Docker, and can be used without Docker! While Docker really brought containers to the everyday toolkit of developers, there have been other similar tools developed (e.g. podman). At the time of writing, however, Docker is still the most popular and widely used container platform used by developers.
Building a very basic image
Images are a core concept of Docker. The first thing we want to do, in order to fully grasp all the upcoming topics, is to build a very basic image from scratch.
Images are built using docker build. The command takes in a single file, Dockerfile, which it reads step-by-step to configure the image.
The beauty of Docker is that you can build an image on any machine, like your own computer, and it can be used on any other computer which has Docker installed. This makes Docker great for packaging dependencies and software without worrying about what operating system everyone is using and if they have conflicting dependencies installed.
Let's build an image right now. You need to have Docker installed.
Note: The following commands affect your local Docker installation only, and all resources we create here can be easily removed. Nothing apart from Docker itself is installed on your machine directly. Everything else goes into disposable containers.
To prepare, create a new directory and an empty Dockerfile in it:
$ mkdir ~/docker-tutorial
$ cd ~/docker-tutorial
$ touch Dockerfile
$ ls
Dockerfile
Next, write the following contents in Dockerfile:
FROM alpine:3.7
ENV  MESSAGE  "Hello from Docker!"
CMD  echo $MESSAGE
(You may have noticed that I've used whitespace to align the columns of text. This is not required, but is common practice to make the file more readable.)
Let's break it down line by line:
-
FROM alpine:3.7tells Docker to use version 3.7 ofalpineas our base image.alpineis a minimal Linux distribution, and is a great starting point for any custom image. Most pre-built images you'll find online (like nginx) are based on it. You could also base your image on e.g.ubuntu. This is a cool feature of Docker: you can easily pick an existing image, of any level of complexity, and just extend it to your needs. SeeFROM. -
ENV MESSAGE "Hello from Docker!"sets an environment variable inside the container. We simply set the valueHello from Docker!to the environment variableMESSAGE. The value gets "hardcoded" into the image, and so any program running inside the container after this step has this environment value in their environment. SeeENV. -
CMD echo $MESSAGEsets a default command to execute when a container from this image is started. SeeCMD.
Other useful instructions would be COPY for copying files from the host machine to the container filesystem, RUN for running commands (such as apt-get) inside the container and WORKDIR for setting the working directory inside the container. See the reference for all available instructions.
Let's now use this Dockerfile to build an image. We'll give it a name of "first-image":
$ docker build --tag first-image .
Sending build context to Docker daemon  2.048kB
Step 1/3 : FROM alpine:3.7
3.7: Pulling from library/alpine
5d20c808ce19: Pull complete
Digest: sha256:8421d9a84432575381bfabd248f1eb56f3aa21d9d7cd2511583c68c9b7511d10
Status: Downloaded newer image for alpine:3.7
 ---> 6d1ef012b567
Step 2/3 : ENV  MESSAGE  "Hello from Docker!"
 ---> Running in ba8b83cbfd79
Removing intermediate container ba8b83cbfd79
 ---> ca483a1aa3e4
Step 3/3 : CMD  echo $MESSAGE
 ---> Running in 352f5b29295d
Removing intermediate container 352f5b29295d
 ---> 4e148bdd477f
Successfully built 4e148bdd477f
Successfully tagged first-image:latest
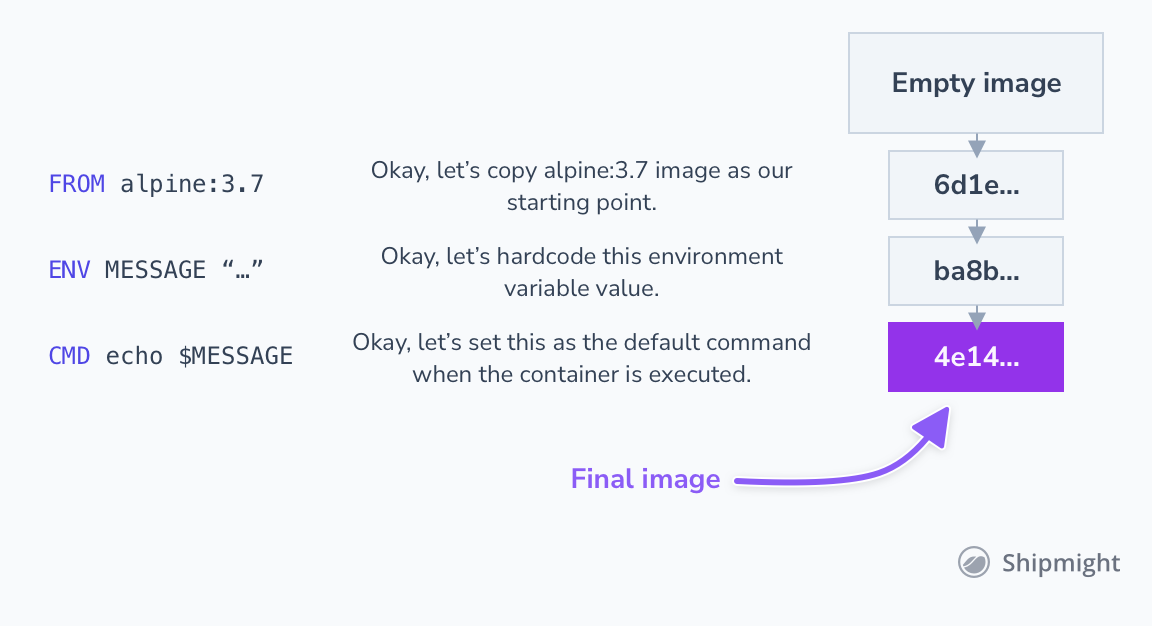
Nice! Docker went through all the lines in out Dockerfile and performed the operations we had configured. Each step was also cached; when we change things, only the changed layers (identified by the SHA-digests you see in the output above) will be rebuilt.
Here's an illustration of the process:
The image was built and we can now see it available on our machine:
$ docker image ls
REPOSITORY     TAG       IMAGE ID        CREATED          SIZE
first-image    latest    4e148bdd477f    2 minutes ago    4.21MB
alpine         3.7       6d1ef012b567    2 minutes ago    4.21MB
Let's start a container with our new image:
$ docker run first-image
Hello from Docker!
That is all it took for us to run a command inside a contained Linux distribution, isolated on our machine. You could push this image to an image registry, and your colleague could pull it from there and run it, and they'd get the exact same behaviour. This is how Docker can be used to package software in a reusable manner.
You can also override the default command. For example, run date which prints out current date:
$ docker run first-image date
Thu Jan 16 12:21:14 UTC 2020
Let's make the image a bit more complex by installing curl into it and calling a mock API. Update Dockerfile to look like this:
FROM alpine:3.7
# apk is the package manager in alpine (same as apt-get in debian/ubuntu)
RUN  apk --no-cache add curl
ENV  MESSAGE  "Hello from Docker!"
CMD  curl -X POST --data-raw "$MESSAGE" -s https://postman-echo.com/post
Now let's build it again, using the name "second-image":
$ docker build -t second-image .
Sending build context to Docker daemon  2.048kB
Step 1/4 : FROM alpine:3.7
 ---> 6d1ef012b567
Step 2/4 : RUN  apk --no-cache add curl
 ---> Running in 18729752a4c4
fetch http://dl-cdn.alpinelinux.org/alpine/v3.7/main/x86_64/APKINDEX.tar.gz
fetch http://dl-cdn.alpinelinux.org/alpine/v3.7/community/x86_64/APKINDEX.tar.gz
(1/4) Installing ca-certificates (20190108-r0)
(2/4) Installing libssh2 (1.9.0-r1)
(3/4) Installing libcurl (7.61.1-r3)
(4/4) Installing curl (7.61.1-r3)
Executing busybox-1.27.2-r11.trigger
Executing ca-certificates-20190108-r0.trigger
OK: 6 MiB in 17 packages
Removing intermediate container 18729752a4c4
 ---> 310020ae5bc4
Step 3/4 : ENV  MESSAGE  "Hello from Docker!"
 ---> Running in ca3f999a8e39
Removing intermediate container ca3f999a8e39
 ---> 7de9a60e37f0
Step 4/4 : CMD  curl -X POST --data-raw "$MESSAGE" -s https://postman-echo.com/post
 ---> Running in 7fef1818a84f
Removing intermediate container 7fef1818a84f
 ---> e43e70afd694
Successfully built e43e70afd694
Successfully tagged second-image:latest
Now run the updated image:
$ docker run second-image
{"args":{},"data":"","files":{},"form":{"Hello from Docker!":""},"headers":{"x-forwarded-proto":"https","host":"postman-echo.com","content-length":"18","accept":"*/*","content-type":"application/x-www-form-urlencoded","user-agent":"curl/7.61.1","x-forwarded-port":"443"},"json":{"Hello from Docker!":""},"url":"https://postman-echo.com/post"}
Works as expected!
At this point let's list our Docker containers:
$ docker ps --all
CONTAINER ID        IMAGE               COMMAND                  CREATED              STATUS                          PORTS               NAMES
72b572fa3ccd        second-image        "/bin/sh -c 'curl -X…"   About a minute ago   Exited (0) About a minute ago                       strange_napier
d98a14f4d10d        first-image         "date"                   8 minutes ago        Exited (0) 8 minutes ago                            condescending_fermat
7af8a001af1c        first-image         "/bin/sh -c 'echo $M…"   11 minutes ago       Exited (0) 11 minutes ago                           ecstatic_leavitt
Note: Earlier we used the command
docker image ls, which lists images that are available in the machine. The last command,docker ps, lists containers which have been started using those images.
As you can see, each line says "Exited X minutes ago". The containers were started but they are not running anymore (we'll cover continuous processes in the next section). We can remove the unused containers like so:
$ docker rm strange_napier condescending_fermat ecstatic_leavitt
Note:
dockerhas autocomplete for bash, so you can just typedocker rm [TAB]and the container names will be suggested.
In the future, when we run containers like these, we might want to specify the --rm option so that Docker will automatically remove the container after it stops. Like so:
$ docker run --rm second-image
{"args":{},"data":"","files":{},"form":{"Hello from Docker!":""},"headers":{"x-forwarded-proto":"https","host":"postman-echo.com","content-length":"18","accept":"*/*","content-type":"application/x-www-form-urlencoded","user-agent":"curl/7.61.1","x-forwarded-port":"443"},"json":{"Hello from Docker!":""},"url":"https://postman-echo.com/post"}
$ docker ps --all
CONTAINER ID        IMAGE               COMMAND             CREATED             STATUS              PORTS               NAMES
No containers were listed, as we hoped for! Docker removed the container automatically after it had finished execution.
You also probably noticed the strange names of your containers. They were auto-generated by Docker. You can specify a name for a container by using the --name option:
$ docker run --rm --name my-container second-image
Great. Let's move on to containers that stay running in the background...
Docker Hub, continuous processes and detached containers
In the previous section we built our own custom image. In this one, we'll utilize the powerful Docker Hub, which contains pre-configured images for nearly any software you might need in your projects.
For example, this is all it takes to start an isolated Postgres database on our machine, using the postgres image:
$ docker run --name my-postgres postgres
...
2020-01-16 12:34:40.853 UTC [1] LOG:  listening on IPv4 address "0.0.0.0", port 5432
2020-01-16 12:34:40.854 UTC [1] LOG:  listening on IPv6 address "::", port 5432
2020-01-16 12:34:40.863 UTC [1] LOG:  listening on Unix socket "/var/run/postgresql/.s.PGSQL.5432"
2020-01-16 12:34:40.898 UTC [55] LOG:  database system was shut down at 2020-01-16 12:34:40 UTC
2020-01-16 12:34:40.930 UTC [1] LOG:  database system is ready to accept connections
Note: As with any terminal command, you can terminate the process by pressing Ctrl+C.
Docker first pulled the image from Docker Hub, and then created and started a container with it.
You can run many of these containers at the same time. While the old one is running, open another tab in your terminal and start a second one:
$ docker run --name another-postgres postgres
...
2020-01-16 12:34:40.853 UTC [1] LOG:  listening on IPv4 address "0.0.0.0", port 5432
2020-01-16 12:34:40.854 UTC [1] LOG:  listening on IPv6 address "::", port 5432
2020-01-16 12:34:40.863 UTC [1] LOG:  listening on Unix socket "/var/run/postgresql/.s.PGSQL.5432"
2020-01-16 12:34:40.898 UTC [55] LOG:  database system was shut down at 2020-01-16 12:34:40 UTC
2020-01-16 12:34:40.930 UTC [1] LOG:  database system is ready to accept connections
Note: Even if both containers logged "listening on port 5432", they are actually listening inside the containers, not on your host machine. So there is no port collision. In the next section we'll learn how to expose ports to the host machine.
You now have two Postgres databases running on the same machine, without having to install anything else but Docker on your computer. The containers don't have access to your filesystem and only make changes inside their own. How neat is that!
Notice that the second time Docker didn't have to pull the postgres image again. It was already available on your machine. As mentioned before, you can list all the available images:
$ docker image ls
REPOSITORY     TAG       IMAGE ID        CREATED          SIZE
postgres       latest    30121e967865    2 minutes ago    289MB
second-image   latest    224c7ee73e67    5 minutes ago    5.6MB
first-image    latest    4e148bdd477f    8 minutes ago    4.21MB
alpine         3.7       6d1ef012b567    8 minutes ago    4.21MB
These Postgres instances keep running until you press Ctrl+C. This isn't very practical if you want to run a database in the backgrond. The solution is to run it in detached mode by setting the --detach (or -d) option:
$ docker run --name my-postgres --detach postgres
4f18a479c6e261f631c18f43b9facb9d99c80da4a7acee7aebe7edd5411b4bc3
Now the container was started and it is still running, but in the background (the output from the command is its ID). You can see it by listing all running containers:
$ docker ps
CONTAINER ID        IMAGE               COMMAND                  CREATED             STATUS              PORTS               NAMES
4f18a479c6e2        postgres            "docker-entrypoint.s…"   50 seconds ago      Up 48 seconds       5432/tcp            my-postgres
You can view its console output:
$ docker logs --tail 10 my-postgres
done
server stopped

PostgreSQL init process complete; ready for start up.

2020-01-16 12:41:19.268 UTC [1] LOG:  listening on IPv4 address "0.0.0.0", port 5432
2020-01-16 12:41:19.268 UTC [1] LOG:  listening on IPv6 address "::", port 5432
2020-01-16 12:41:19.271 UTC [1] LOG:  listening on Unix socket "/var/run/postgresql/.s.PGSQL.5432"
2020-01-16 12:41:19.286 UTC [55] LOG:  database system was shut down at 2020-01-16 12:41:19 UTC
2020-01-16 12:41:19.291 UTC [1] LOG:  database system is ready to accept connections
You can execute a command inside it (substitute whoami with your command):
$ docker exec my-postgres whoami
root
Note: Processes inside Docker containers run as root by default. This can (and should!) be changed per-image via the
USERinstruction in Dockerfile.
You can stop it:
$ docker stop my-postgres
my-postgres
And you can remove it (add --force or -f to force removal if it's running):
$ docker rm my-postgres
my-postgres
You can usually find a premade image for any software. Simply google for "software docker". For example, here's a bunch of ready-to-use, popular images:
You can try any of these by simply running docker run <image>.
Ports and volumes
Above we started some containers, but didn't really communicate with them. In most projects there are two types of communication you would want to do with your software dependencies:
- Network, for example connecting to a Postgres database at a specific port
- Filesystem, for example reading and writing nginx configuration files
It's very easy to achieve both in Docker.
For network access, we can configure shared ports for containers. For example, Postgres by default listens to port 5432. We can expose this port to our host machine via the --publish (or -p) option:
$ docker run --name my-postgres --publish 5432:5432 postgres
Above we tell Docker to map the port 5432 on our host machine to the port 5432 inside the container. You can try it if you have psql (the Postgres client) installed on your host machine:
$ psql postgres://postgres:postgres@localhost:5432/postgres
Note: The username, password and database name are all defaults ("postgres"), as is documented on the Docker Hub page. We will learn how to customize them in the next section.
For filesystem access, we can tell Docker to bind mount a specific directory (or file) to a location inside the container. For example, we could persist the Postgres data directory on our host machine:
$ docker run \
    --name my-postgres \
    --volume /path/to/docker-tutorial/postgres-data:/var/lib/postgresql/data \
    postgres
Now when inside the container Postgres writes its data to /var/lib/postgresql/data, the files are actually stored on your host machine at /path/to/docker-tutorial/postgres-data.
Or we could substitute the nginx configuration file with our own:
$ docker run \
    --name my-nginx \
    --volume /path/to/custom/nginx.conf:/etc/nginx/conf.d/default.conf \
    nginx
It is also possible to specify read-only access for the container by adding :ro, if necessary. In that case the container can't write to the mounted location:
$ docker run \
    --name my-nginx \
    --volume /path/to/custom/nginx.conf:/etc/nginx/conf.d/default.conf:ro \
    nginx
In these examples we mounted locations to actual locations on the host machine by specifying the absolute path to them. Docker also supports Docker volumes, which are storage volumes managed via docker commands. You can create a volume:
$ docker volume create my-postgres-data
And the use it by its name:
$ docker run \
    --name my-postgres \
    --volume my-postgres-data:/var/lib/postgresql/data \
    postgres
Behind the scenes Docker volumes are actually just directories created by Docker. They are stored in a hidden folder (e.g. /var/lib/docker/volumes in Linux).
You can choose to use bind mounts or Docker volumes based on your preference. Bind mounts are perhaps easier to understand and inspect in the beginning, because you have to specify a concrete location for them.
Environment variables
If a container expects custom configuration, it is usually done via environment variables (--env or -e). For example, we can customize the Postgres user, password and database name when starting the container:
$ docker run \
    -e POSTGRES_USER=foobar \
    -e POSTGRES_PASSWORD=secret123 \
    -e POSTGRES_DB=my_database \
    postgres
Such configuration varies based on the image, and is usually documented on the Docker Hub page for that image. Search for "Environment Variables" on the postgres image page.
Where to go from here
In the beginning you'll probably find Docker more useful for deploying your development dependencies than building your own images.
The simplest way to get going is to just use the docker command in your next project to start third-party dependencies. You will probably find it faster and more convenient to manage simultaneous database instances, etc., than what you were using before.
Some useful examples to get started with databases:
$ # connection string: postgres://postgres:postgres@localhost:5432/postgres
$ # add to persist data on host: `-v /path/on/host:/var/lib/postgresql/data`
$ docker run -d -p 5432:5432 postgres

$ # connection string: mysql://example:secret123@localhost:3305
$ # add to persist data on host: `-v /path/on/host:/var/lib/mysql`
$ docker run -d -p 3306:3306 \
    -e MYSQL_ROOT_PASSWORD=super_secret123 \
    -e MYSQL_USER=example \
    -e MYSQL_PASSWORD=secret123 \
    -e MYSQL_DATABASE=my_database \
    mysql
Once you're comfortable with starting and managing containers manually, the next step could be to specify your development environment in a file called docker-compose.yml and to use the docker compose command to start/stop dependencies. This way anyone can clone your project source code, run docker compose up and be ready to start developing. Here's an example docker-compose.yml, taken directly from postgres Docker Hub page:
version: "3.1"
services:
  db:
    image: postgres
    restart: always
    environment:
      POSTGRES_PASSWORD: example
  # Web admin interface for SQL databases, similar to PhpMyAdmin
  adminer:
    image: adminer
    restart: always
    ports:
      - 8080:8080
You could add other services you need into the specification, then just run docker compose up and Docker will start the new ones and remove the old ones. Running docker compose down will remove all containers and their volumes. Try it and you will see it is a very efficient way to set up and share local development environments per project for your team.
Other helpful commands when getting started
Cheatsheet for common operations:
$ docker run -p <host_port>:<container_port> <image>
$ docker run -e NAME=value <image>
$ docker run -v /host/path:/container/path <image>

$ docker ps
$ docker ps -a

$ docker logs <container>
$ docker logs --tail 10 <container>
$ docker logs -f <container>

$ docker exec <container> <command>

$ docker kill -s <signal> <container>
$ docker kill -s HUP <container>

$ docker start <container>
$ docker restart <container>
$ docker stop <container>
$ docker rm <container>
Remove all containers, including running and not-running:
$ docker rm -f $(docker ps -a -q)
Remove any images that are not used currently by any container:
$ docker image prune
Remove any volumes that are not used currently by any container:
$ docker volume prune
Here's an image version you can save to your disk:

Comments?
What did you think of this tutorial? Did we miss something?
Let us know at hi@shipmight.com!
Newsletter
Join the mailing list to get notified when a new version or new content on the website is released. Max 1 email per week.